Internet Cloud Security
I have been thinking a lot about internet security lately. A buddy suggested I read this article and it became an immediate priority for me to make sure people are more educated about security on the internet.
Definition of the Cloud
The Cloud is a term that is loosely applied to any system on the internet that is used to store and manage data for access from a remote location. Any website that you “login” to is essentially part of the cloud, especially if it stores any of your information. Facebook is a cloud system. Your email is likely a cloud system. There are many advantages to Cloud computing, but there are also risks. Reasonable people can disagree on whether the advantages outweigh the risks, but if you are reading this, you have probably taken for granted that the risks are small enough in comparison to the benefits. That is, you haven’t completely removed yourself and any information that identifies you or is important to you from the internet but rather take precautions that you deem appropriate and proportionate to the risks that come along with internet usage.
I highly recommend reading the article cited above, but make sure you finish it if you start. It ends well with some great suggestions. However, in case you really don’t want to read it, here are a few things that I want to stress as part of the topic of security on the internet:
1) Password security
Aside from never using the word “password” or “12345″ as your actual password, there are some important things to remember when creating a password:
a) Don’t reuse a password for too many different logins, especially for your main email account
b) Make sure your password is strong. This doesn’t just mean upper and lower case letters, but numbers and symbols. Make your password something other than an English word. It helps if you know another language or if the site supports using spaces in your password, in which case you can use an entire phrase
c) Change your passwords from time to time. Obviously this is less convenient, so you will have to decide what balance of convenience and security you are comfortable with.
2) Data backup
While I don’t think backing up your entire email account is completely necessary, if you will sleep better at night, it might be a good idea. There are several ways of doing this but the easiest would be to use Outlook or Thunderbird to download your email through a POP server. If this is jibberish to you, give us a call or email and we can explain it or schedule a time to do it for you.
You also want to make sure your data on your computer is backed up and safe. In case you missed my post on backups, I highly recommend the program CrashPlan. Make sure you use a unique and strong password for your CrashPlan account too ![]()
3) Don’t use unsecure websites
The most obvious security threat comes from anything pornographic, but there are plenty of sites that can be unsafe to use. Be wary of “new” sites you found through a Google search, especially if the site wasn’t listed on the front page of the search. Try to stick to sites you have heard of. Follow the guidelines suggested in this post.
4) Be careful when using a public computer
This doesn’t just mean the computer in the library or coffee shop. Anytime you use a friend’s computer or check your email at your parents’ house, you are more vulnerable. Make sure your password is not saved and that you sign out of any website that you were using. Don’t just close the web browser.
5) Use a better web browser
Avoid using Internet Explorer. Internet Explorer is more vulnerable to hacking attempts than other browsers. Use Mozilla Firefox or Google Chrome.
6) Make sure your WiFi connection is secured
Many home wireless networks are still open and unsecure. If your wireless network is not secured, your computers are open to intrusion from almost anyone. Your wireless key should be a strong password using a WPA2 encryption. If you are not sure how to do this, call us and we can help you. When you connect to wireless networks outside your own home or work, make sure your firewall is configured to block incoming traffic. On Windows Vista and Windows 7, this can be easily done by selecting “Public” after connecting to the wireless network.
7) Use HTTPS
If your email provider supports it, make sure you use https instead of just http. You can tell if this is the case by looking at the address bar in your web browser. This is where the URL or address of the website is shown. If it begins with https, you are good. If not, check to see if the option is available. This is an extra layer of security for your account. This is also true for Facebook. Check your security settings.
Questions/Suggestions?
What other things would you suggest in order to make sure your data remains safe and accessible in the cloud? Do you have any questions?
Block All Advertisements in Chrome and Firefox
Advertisements on the world wide web are a nuisance, and in many situations they can ruin the experience of browsing the web. We all know what it’s like to be attacked by popups, and annoying ad’s that will sometimes even forward you to a different website, and keep users from seeing the content they intended to view.
Viruses and malware are now a bigger problem than ever, and a lot of this malicious software slips through sketchy ads. Not only is it beneficial to block ads because they are annoying, it’s also an excellent way to help prevent viruses, malware, spyware, and adware from entering your system.
Adblocking software is also capable of blocking most ads in videos, including the annoying commercials that play before the majority of most Youtube videos.
How To Block Advertisements in Firefox or Google Chrome
1. Open Firefox or Chrome and navigate to http://adblockplus.org/en/
2. Click the button that says “Install Adblock Plus – It is free, no hidden costs!”
3. Click the “Add” or “Allow” button and to add the extension.
4. The default settings will block the majority of ads, and is usually all a user needs. You are also able to configure the settings for the add-on to add more lists, but is not necessary for the regular user.
5. If Adblock Plus misses an advertisement, right click on the ad, and click “Adblock Plus – Block Image”.
Aren’t Advertisements Important Sometimes?
In some cases displaying advertisements can be important to a web user. Possibly you have a website with advertisements, or have a job in marketing, and need to see your competitors advertisements. Adblock has an icon that you can click which allows you to easily unblock ads on specific sites. Another easy solution is to just have two browsers, one setup with Adblocking software, and the other without.
You should now have a better idea on how to block ads in Firefox or Google Chrome.
Beware of Rogue Anti-Viruses, Scareware
Rogue Anti-virus programs (also called “Scareware”) are spreading like wildfire. These programs pretend to be legitimate anti-virus programs, and lock users out their software, making the computer inoperable. They then warn that the computer is infested with viruses, and that you need to activate the program by giving them your credit card.
DON’T GIVE THEM YOUR CARD! These are fake programs created by criminals and they are likely to charge more then what they ask for. Regular anti-virus programs won’t lock you out and ask for payment to remove infections. Since the “Scareware” program, blocks users from accessing their programs, they can be a little tricky to remove if you don’t know the proper methods.
HOW TO REMOVE
There are many different Rogue Anti-virus programs, but the proper removal process is almost always the same. In order to gain control of your computer again, you must boot into “Safe Mode with Networking”.
MANUAL REMOVAL (Advanced)
1.Restart your computer. When it first turns on, repeatedly press the “f8” key, to bring up a menu. In the menu, use your keyboard to select “Safe Mode with Networking”.
2.Now that you are in safe mode, you will usually see an icon for the rogue anti virus program on the desktop. (typical names are “Spyware Protect 2009/2012, XP-Antivirus, and System Security 2012.) Don’t open it! RIGHT CLICK on the file once and goto properties. It will now show the actual location of the virus. Almost always the virus will be located in the windows “Application Data” folder.
3.Now that you know the name and location of the Rogue Virus, browse to the folder where it is located, and delete the file. Make sure to empty the recycle bin to ensure it is gone for good.
4.Next, remove the virus from the windows startup using Msconfig. For Win7 and Vista, click the start button, and in search box, type “msconfig” and press the “enter” key. For XP and older versions, click Start, then “run”, then type “msconfig” and press the “enter” key.
5.Navigate to the “Startup” tab, and deselect the scareware program from the list. If having trouble finding it, it is usually located in the “Application Data” folder, and you should be able to see it in the list.
6.Stay in msconfig, and check the “services” tab to make sure the program isn’t located in there as well.
7.Click Apply, and close msconfig. It will ask if you want to restart. Restart the computer, and the fake anti-virus program should be gone. After you reboot, update your current real anti-virus program and do a “full scan” to ensure there are not any other infections.
BASIC REMOVAL
1.Boot into “Safe Mode with Networking” using the same instructions located above.
2.Now that you are in safe mode, download and install the free program “SuperAntiSpyware”, and run a quick scan or full scan.
3.SuperAntiSpyware should pick up the virus and remove it. After the scan, the program will usually require a restart to finish the removal process.
4.If SuperAntiSpyware doesn’t do the job, try another free program called “Malwarebytes”.
5.If both programs fail to help, use the manual removal instructions located above.
How to Back Up Your Computer to DVD the Old Fashioned Way
There are many great programs out there that automate the backup of your files. Some are free while others you have to pay for. Either way, you have to learn how to use the software which can be a daunting task for someone that is not too computer literate. Below you will find steps that help you manually back up the files on your computer to external media such as a DVD.
We rely on computers every day and with that comes the issue of backing up your files. It is key to backup files from time to time because if anything were to happen to your hard disk, you could loose your information.
People rarely back up their files because of a certain intimidation that still exists. Files are scattered throughout your desktop and your computer. It gets overwhelming to find all these files therefore people do not do anything at all.
One technique that we use when backing up their computers is to organize every file on the computer that needs to be backed up. Usually, these files are located on the desktop and in the My Documents folder. I create a few folders on the desktop and limit each folder to the size of a disk whether it be a CD or DVD depending on how I am backing up my files. Using this method, each folder is equal to one backup disk. This way, the files are a little easier to manage.
I move all the files from the My Documents folder and put them in the folders that I created. After the files are in the respective folders on the desktop, I open up the My Computer folder and open the disk drive that will write the disks. This is assuming of course that you have a CD or DVD burner and you are using Windows XP.
Click on “Write Files to Disk” and then follow the on screen wizard.
Once you are finished backing up all your files, move them back to My Computer. You can also remove them if you need the space.
How to Delete Private Data From the Firefox Web Browser
In this tutorial you will learn how to clear your private data in Firefox browser.
In public places like schools where many people use the same computer, you want to keep your personal data to yourself. This also applies to libraries.
Here are a few simple steps how to clear the private data and browsing history from Firefox after a session on the Internet.
1. Look for the Tools menu item on the file menu on the top of your browser screen.
2. Click on the Tools menu items and then a drop down menu should appear below it.
3. Click on Clear Private Data
4. Check all the categories that you want to clear***
5. Once all the appropriate boxes are checked, click on Clear Private Data Now
***Be careful what you check if this is someone’s home or business computer – if they use the “save password feature” on Firefox, you can clear ALL the saved passwords – some people rely on this function to log into email and other websites that require a password.
Is your WIFI Network Protected?
Most people assume if they have a password set on their wireless network that they are safe. This is usually not the case. There are three main types of security methods, and all can usually be cracked quite easily and quickly.
WEP
WEP’s are very easy to crack, and takes almost no time at all. Software can decrypt the password by observing patterns of packets collected in the air. WEP is an older password method, but is still commonly used, and it is even set as default for many new routers. Avoid WEP whenever possible.
WPA / WPA2
WPA and WPA2 is the safest method to use, but can still be cracked if the password is too short or commonly used. The attacker will “sniff” the network and get the encrypted password. They will then feed the string into a program that goes through very large password lists or guesses every combination till it finds the decrypted key. These programs can guess thousands of passwords per second, and if the cracker uses multiple computers, they can guess many combinations VERY quickly. Make sure to make the password very robust. A good rule of thumb is to create a password that nobody else on earth is ever likely to use.
Invisible Network
This usually can easily be circumvented by using software that waits for a user to connect to the network. This then gives away the SSID or network name away.
Mac Address filtering
Mac address filtering is another method that can easily be beaten. The attacker can spoof their MAC address to be the same as a user on your network, and trick the router into thinking they are that user.
Rogue WIFI Networks
Another thing to look out for is Rogue WIFI networks. Hackers can easily set up a network with the same name as yours, kick you off and force you to connect to their network without your knowledge. They then strip all the browser encryption from your session, making them able to view everything, including grabbing sensitive information like passwords, credit card numbers, and banking information.
Remember, everyone is a target. It’s possible to build very sophisticated antennas that can connect from long distances. The attacker could have many reasons to break in. Once they penetrate your network, they can usually break into other systems on your network. Attackers can also use your network to commit crimes and cover their identity. Once they have the password, they can decrypt packets they “sniff” from the air, and see your private data.
Use WPA or WPA2 and make sure to set a long and unique password.
CrashPlan Backup
I recently came across some amazing backup software called CrashPlan that I just had to share. CrashPlan is very competitively priced and has several advantages over other backup solutions like Carbonite or Mozy.
1) CrashPlan has several FREE backup solutions
While I certainly recommend paying for and using CrashPlan’s online cloud storage, you can also download and use the software to backup to an external drive, another one of your computers, or a friend’s computer all for FREE. These options are a great supplement to an online backup in case you have a lot of data. A local backup would let you restore your data faster and get you up and running again in the event of data loss.
2) CrashPlan has great customizable options
There are all kinds of options in the CrashPlan application that let you choose how, when, and what to backup. You can choose whether or not to encrypt your data and how often you want CrashPlan to look for new files to backup. The interface is easy to use and the options are extensive, so advanced users can customize how they want their backup to happen.
3) CrashPlan is secure
CrashPlan uses 128-bit encryption to transfer your data and 448-bit encryption to store it. This means that you never have to worry about someone accessing your files from your backup. Even if you backup to a friend’s computer, they cannot access your encrypted files. CrashPlan monitors all of your backups and can send you emails or even tweets as often as you choose to let you know the status of the backup or if there is a problem.
4) CrashPlan is compatible with any system
My favorite part about CrashPlan is its compatibility across different types of computers and operating systems. CrashPlan is compatible with all versions of Windows, Apple OS X, Linux, and even Solaris. This means that you can backup your Mac to your PC and your PC to your Mac without worrying about any compatibility problems.
Check out CrashPlan at http://www.crashplan.com
E-mail Archival
Many small businesses archive their email in Outlook or on their mail server. As user’s inboxes grow it often takes longer to search for messages or navigate through email. This is because Outlook isn’t designed to store many gigabytes of email. Users often delete messages or export them to a PST file until a deleted message is needed or Outlook starts running slowly.
Our mail archiving solution retrieves email from your mail server and stores it in a separate database optimized for searching. Searches are done through a web interface; messages can be exported for SOX compliance and are encrypted on the server.
|
E-Mail Archival Features & Benefits
|
|---|
- User and auditor roles – Users can be granted permission to search all email.
- Compatibility – Works with most POP3 & IMAP email servers (including exchange)
- Web Interface – Easy to use Web Interface works across platforms.
- Fast Searching – Indexed searching for fast results.
- Scalable – Run different components on different/multiple servers for added speed.
Enabled Suspend & Hibernation To Save Energy
 With energy prices moving higher it is important to conserve energy both to help the environment and save money. By following these steps you can save electricity and have fast access to your computer. Most computers support suspend/hibernation however it is often not enabled or miss configured.
Background:
Computer systems normally consume around 100 to 200 watts of energy. The cost of leaving a computer on 24/7 is around $456/yr (@ $0.26kw/hr). Simply enabling suspend or hibernation mode can dramatically cut your energy usage while giving you almost immediate availability. Modern computers have three power saving modes each using less power.
- S1 Standby – The least efficient mode as only the processor and monitor enter power save mode.
- S3 Suspend (Suspend to RAM) – All devices turn off except memory which holds system state information. This is the preferred mode as it offers both fast startup and low power usage (~5watts) however some hardware may not support S3.
- S4 Hibernation (Suspend to Hard Drive) – The system state is saved to hard drive and the computer shuts off. Almost no power is consumed however startup is longer (~10seconds).
Choosing a Power Save Mode:
For desktops I prefer S3 Suspend and for laptops S4 Hibernation because the battery isn’t used. S4 Hibernation maybe your only option if a device or driver is preventing your computer from entering S3 Suspend.
Enabling S3 and S4:
Computers often ship with S1 enabled. You can see which mode is enabled by going to Start->Shutdown->Standby. If your computers hard drive and fans are spinning then you’re in S1, if the computer appears to be shutdown your in S3.
To enable S3 go into the BIOS Setup then Power Management and change your suspend mode from S1 to S3.
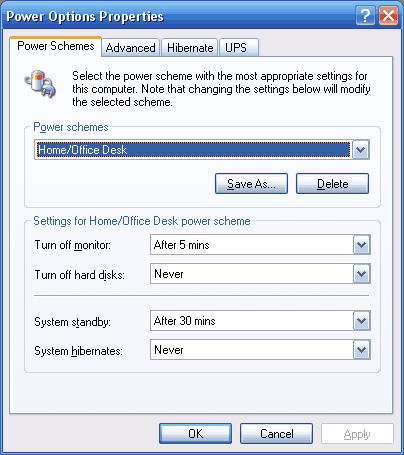
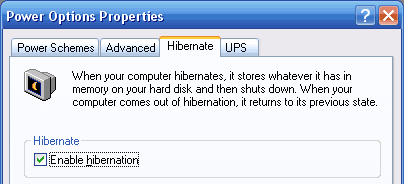
To enable S4 open Power Options in the Control Panel and click on the Hibernation tab then click on Enable hibernation. Now when you go to shutdown you’ll see Hibernate, if not hold down the shift key.
Automatically enter S3 and S4:
Your computer can automatically enter suspend or hibernation mode if the computer has been idle for a period of time. Simply change the System standby (S3) or System hibernates (S4) values in the Power Options control panel.